This procedure covers the re-furbishment of pre-1968 Land Rover windshield mounted Lucas wiper motors. Note: This page is just a guideline for performing this procedure, please refer to references and the Green Bible if you have questions before starting. These repairs will fix problems with electrical connections, obstruction/friction based loading, brush renewal and general cleaning issues, it will not address coil or rotor based issues.
References:
http://nhua.co.uk/smf_1-0-5/index.php?PHPSESSID=8efe49eb0f0a0cea5038b978bcdeac86&topic=6792.0
http://www.lrfaq.org/Series/FAQ.S.wipermotors.html
Required Tools and Materials
Slotted screwdrivers, 1/8 Whitworth wrench/socket, forceps/small pliers, toothbrush/acid brush, electrically safe solvent (NO ACETONE), grease (good quality, high temperture variance), soldering iron, carbon brushes and safety glasses. (A note on carbon brushes, you need low voltage brushes for the wiper motor if you can’t find them as a hardware store go to an automotive alternator/starter shop.)
Procedure:
Pictures at the bottom of the page are of a cleaned motor being taken down, to put to motor in working order reverse the order the pictures are view in. (Sorry for the flash glare on some pics.)
Removal:
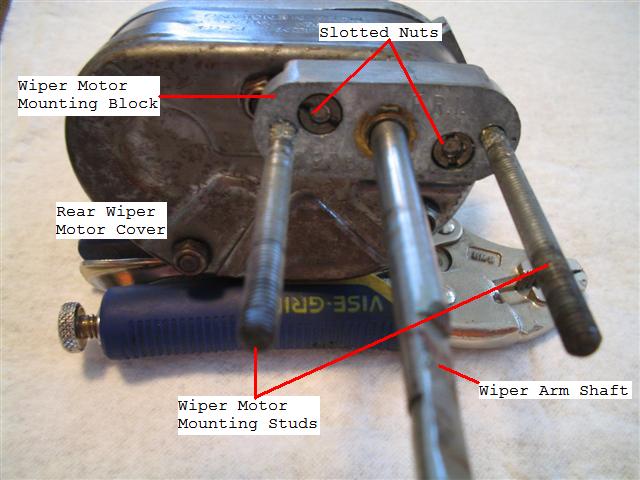
I suggest you give all 4 post and mounting plates with a spray with penetrating oil a few days before you start, only the man upstairs knows how long they have been in place and it is very possible that the corrosion has seized the motor securely to the frame. First undo the electrical connections to the motors, marking each wires location and insulating the conductor with electrical tape. Next remove the windshield wipers and shaft adapters. The motors on the Land Rover are generally held in place by a pair of double-nuts on 2 threaded shafts, sometimes the shafts come off with the nuts this is fine set aside for later, remove nuts later. Remove the outer rubber washers, the wiper arm guard, the wiper motor seal and the outer wiper motor mounting block and gently give the parts a cleaning. Withdraw the motor from its mount, a little persuasion may be needed just go slowly. Move project to workbench or table top. If you are able to save one of the flat seals, make a template and cut new seals out of an old tire tube; the other formed seal is available from LR vendors.
Dis-assembly:
Starting from the back of the motor, first remove the mounting posts (if they did not remove while pulling the motor). Next take a remove the 2 slotted nuts in the inner mounting block with a slotted screwdriver (if the inner post sticks up too high you may need to use a pin wrench, but I have never found this to be a problem). With you safety glasses on, remove the C-clip attached to the wiper motor shaft, ensuring the you have a grasp on the spring (!!! WARNING !!! SPRING IS UNDER TENSION AND COULD CAUSE EYE DAMAGE), C-clip can be pried away with a small screwdriver, remove retaining washer and spring. Now remove the 3 nuts holding the rear case cover on the motor. Set all parts aside for cleaning and re-use.
Looking at the back of the motor now you will probably see hard yellow waxy substance inside the rear cover and around the gears of the motor block, this was grease installed at the factory that has hardened. Lets now take a few pics and notes so we can get this bad boy back together.
Working in we find the connecting rod, wiper crank arm, final gear drilled with an offset bearing, below the bearing is the pin from a shaft that runs to a follower arm where the motor shaft comes out of. Under the outer final gear is a double intermediate gear which engages both the edge of the final gear and the motor shaft. The motor shaft runs into the motor casting where the motor (coil/rotor/brushes) is located. Carefully remove the connecting rod, gears, crank arm and the wiper shaft (this comes out the front of the wiper assembly). If you wish at this point you can remove the studs for the back case cover. I try to wipe away a much crud as possible before cleaning with solvent and a toothbrush; clean gears, pins, shafts and outer case covers.
After removing the connecting rod and gears from the motor casting to clean all surfaces including hollow shafts and the bearings. Be careful, go slow and do not pressure/pry/stress the bearings; time is on your side. If things do not remove easily check for metal burrs on the hollow shaft and remove with a small fine file or Dremel.
Now to remove the front cover. Using a slotted screwdriver remove the 2 screws on front of the housing cover and motor “ON” lever by pulling straight out. Gently pull away front cover a 1/2″, with small screwdriver pry and loosen the power screw pad toward the rear of the cover then remove front cover leaving power connection attached to commutator assembly.
Remove with forceps the small spring holding the carbon brushes against the rotor. Now pull the brush arms away from the pivot studs, remove brush from commutator housing and dropout carbon brushes. If the carbon brushes are worn, replacements can be found at most hardware stores, it is worth replacing the brushes now that you come this far.
(Note: The next paragraphs will deal with cleaning and greasing the rotor bearings, if you rotor spins freely you may opt to skip these steps. Soldering may be required.)
Desolder the field coil and power input from cummutator bracket, you can do it without desoldering but be careful the wires are small old and brittle. Keep the solder handy. Remove the two Whitwoth nuts holding the cummutator bracket in place, letting slide up over the motor shaft. Next remove rotor, then the 2 studs retaining field coil and pole assembly and gently remove field coil and pole assembly from motor housing. Set aside all parts gently clean all parts, being especially careful with the field coil and rotor (please use only electrically safe solvents). Remove any further parts.
This is basically the end of dis-assmebly.
Clean Up:
(Note: Please use an electrically safe solvent to clean away the grease and motor. Do not soak any parts in solvent as it could destroy some parts. I generally use electrical contact cleaner or alcohol on the field coil and rotor.)
Clean all parts throughly. Paint rear outer case if desired, polish the front pot metal pieces if desired. Using a cotton swab dipped in solvent clean bearing holes. I like Castrol Purple Stuff and hot water to clean parts (not red fiber gear).
Re-assembly:
The re-assembly is the opposite of dis-assembly so I will quickly go through this section.
The first items to go back together are the pole and field coil assemblies in the motor housing and install studs holding these down. Next grease the rotor bearing surfaces (brass pieces) and install rotor. Install carbon brushes in arm and tighten nuts holding down communtator bracket. Re-install small spring across brush arms with forceps. Resolder field coil wires to cummutator and power input. Install wiper arm shaft.
Moving to the back of the motor assembly grease all gears and brass bearing surfaces. Install intermediate gear, then the main gear, re-insert hollow shaft crank arm; greasing all bearing and pivot locations, finally install connecting rod. From the front of the motor housing, grease and insert the wiper arm shaft into the crank arm/bearing. Add a little extra grease where needed.
Install back cover studs, then the back cover of wiper motor and install the 3 nuts holding the cover in place. Replace mounting block and tighten slotted nuts. Put a small amount of blue lock-tite on threaded rods and tighten into wiper motor housing. Install front cover on motor, replace selector switch and tighten 3 screws on the front of the wiper motor housing. Install spring, retaining washer and C-clip on wiper arm shaft.
Installation:
Remount the wiper motor in windshield frame is the opposite of removal.
Pictures:


June 11, 2007 at 8:42 pm |
Hello!
Thank you so much for the wiper repair info. I am gearing up to replace all my electricals and repairing the wipers are on the list!
I placed a link to your blog on my blog (http://grover-the-rover.blogspot.com/).
Thanks again,
Larry Correus
January 21, 2010 at 7:01 pm |
Dear Angryant,
Thanks for the post about the wiper motors. I just bought a 1969 series II a, single cab which does not have any wiper motors at all. I am sure your post will help me….If in any doubt, will contact you..Thanks again
Suki Wu
Sri Lanka
June 25, 2010 at 8:30 pm |
Thanks for sharing your good work!
September 6, 2010 at 5:07 pm |
Hi,
This is a bit old, but have just stumbled on it. This is great as the passenger wiper motor on my 1959 Series II has packed up and I cant get a purchase from Ebay to work. I think though that I am doing something very simple wrong.
On the motor I took off only one wire was attached. The Ebay one arrived with 2 wires attached. Should 2 wires be involved and, if so, where does the second one connect? I thought that the earth was internal.
Many thanks
David
December 2, 2011 at 11:49 am |
Excellent write up and piccies. I found after mounting the motor I needed to adjust the field coil and lamination position slightly as they can rub or contact the rotor. Also switch can become slack and rattle. Rivet slightly and clean contact points well.
January 17, 2012 at 8:32 pm |
Land Rover Hertfordshire…
[…]Series Rover Lucas Wiper Motor Refurbishment « The Wandering Hippo[…]…